
Deep garage shelving is a great way to make the most of your storage space. Whether you want to store boxes, coolers, or even holiday decorations, these shelves will allow you to get much more out of your garage.
How to choose Garage Shelving
It is important to measure your garage space before you purchase any shelving. This will help you choose the right garage storage shelving for your needs. There are many options for shelves, both adjustable and fixed-height. Some shelves are best suited for larger items, while others are more suitable to store smaller items.
The Most Popular Styles of Garage Shelving
Garage shelving comes in many styles, so make sure you know what you are looking for. A variety of styles and designs are popular, including corner units, a floor-to–ceiling system, or shelving that can be attached on to your garage walls. A shelf system that includes a workbench is also an option.
Attached Shelves
The 2x4 wall-mounted system is a simple and affordable way to add shelving to your garage. These systems can be found at most local home improvement stores. They are also very simple to assemble.
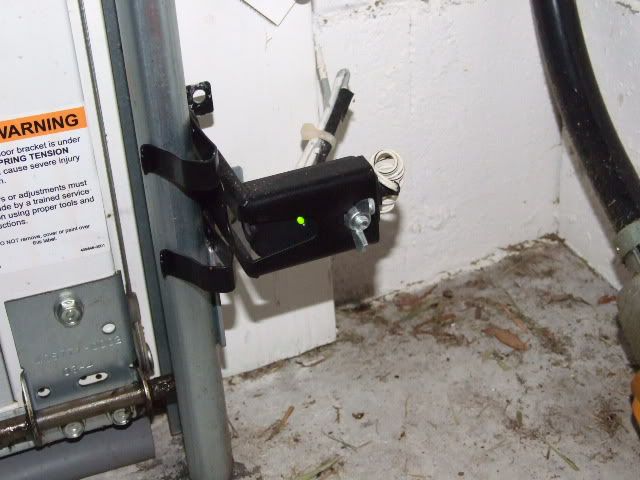
This garage storage shelving system can be easily customized to fit your needs by changing the width and depth of the brackets. For better storage, you can adjust the spacing between the brackets.
These systems are easy to install on any wall. They can also be attached to the studs with screws. They are easy-to-install and don't require any tools.
They can also be used to store heavy items. They can hold 600 pounds of weight, which makes them an ideal choice for people who need to store large items.
Fleximounts 3-Tier Adjustable Rail Shelves
These shelving units are adjustable and can be used for different storage needs. These shelves have vertical metal tracks that slide into the slots in the wall and brackets that lock them into place. They are made of steel wire so that they can support heavy loads.
A freestanding wooden unit can also be used as garage shelving. These units are easy to assemble and move around as needed, but they may not be as durable as other wall-mounted shelves.
Wooden shelving can be purchased in kits which include all necessary hardware for a successful DIY job. It's important to check the kit's instructions to ensure that you have all of the materials you need.
A 24 inch deep shelf will give you plenty of space to store boxes, totes and other large items. It will also help to keep your items off the floor, which can help prevent accidents.
This shelf is an excellent way to organize your garage, and keep your items safe. You can use it to store small appliances, tools, and anything else that you need to be kept safe.
FAQ
How should you renovate a home?
The roof. The plumbing is the second. The electrical wiring is third. Fourth, the walls. Fifth, the floors. Sixth, the windows. Seventh are the doors. Eighth, the kitchen. Ninth, bathrooms. Tenth, garage.
Once you've completed these steps, you can finally get to the attic.
You might consider hiring someone who is skilled in renovating your house. Renovation of your house requires patience, effort, time and patience. You will also need to spend money. It will take time and money.
Renovations are not always cheap but can save you lots of money in long-term. Plus, having a beautiful home makes life better.
What are the included features in a full remodel of your kitchen?
A full kitchen remodels more than just a new sink and faucet. There are cabinets, countertops as well, lighting fixtures and flooring.
Full kitchen remodeling allows homeowners to make small changes to their kitchens. This means that there is no demolition required, making the process easier for both homeowner and contractor.
Many services are required for kitchen renovations, such as electrical, plumbing and HVAC. Depending on the extent of the kitchen remodel, multiple contractors may be required.
A team of professionals is the best way to ensure that a kitchen remodel runs smoothly. Kitchen remodels are complex and can be delayed by small issues. DIY kitchen remodels can be complicated. Make sure you have a plan and a backup plan in case of an emergency.
What are the top expenses associated with remodeling a Kitchen?
Planning a kitchen renovation can be costly. These include demolition, design fees, permits, materials, contractors, etc. These costs seem small when you look at them individually. They quickly grow when added together.
Demolition is usually the most expensive. This includes removing cabinets, countertops and flooring. The drywall and insulation must then be removed. You must then replace these items with new ones.
Next, an architect must be hired to create plans for the space. Next, you must pay for permits to ensure the project meets building codes. The final step is to find someone to carry out the actual construction.
Once the job has been finished, you need to pay the contractor. Depending on the size of the job, you could spend between $20,000 to $50,000. Before hiring a contractor, it is vital to get estimates from multiple people.
If you plan, you can often avoid some of these costs. You may be eligible to get better prices on materials, or you might even be able skip some of your work. If you know what needs to be done, you should be able to save time and money during the process.
Many people attempt to install cabinets themselves. This will save them money as they won't need to hire professional installation services. They often spend more trying to install cabinets themselves. A job can typically be done in half the time than it would take for you by professionals.
A cheaper way to save money is buying unfinished materials. Before purchasing pre-finished materials like cabinets, you must wait until all the pieces are assembled. You can begin using unfinished materials right away if they are purchased. And if something doesn't turn out exactly as planned, you can always change your mind later.
Sometimes, however, it's not worth all the effort. Planning is the best way save money on home improvement projects.
What's the difference between a remodel or a renovation?
A remodel is major renovation to a room, or a portion of a rooms. A renovation involves minor changes to a specific room or part of it. A bathroom remodel, for example, is a major undertaking, while a new sink faucet is minor.
A remodel involves replacing an entire room or part of a whole room. A renovation involves only changing a portion of a room. Remodeling a kitchen could mean replacing countertops, sinks or appliances. It also involves changing the lighting, colors and accessories. But a kitchen update could include painting the wall color or installing a new light fixture.
What is the cost of remodeling a kitchen or bathroom?
Remodeling a kitchen or bathroom is a costly undertaking. It may make more sense to spend money on home improvements, considering how much you pay in energy bills each month.
An inexpensive upgrade can save you thousands of dollars every year. Simple improvements such as insulation of walls and ceilings can lower heating and cooling costs up to 30 percent. Even a minor addition can increase comfort levels and increase the resale value.
When planning for renovations, it is important to select durable and easy-to-maintain products. The durability and ease of maintenance that porcelain tile and stainless steel appliances offer over vinyl and laminate countertops is why solid wood flooring and porcelain tile are so much better.
Altering old fixtures can also help reduce utility bills. For example, installing low-flow showerheads and faucets can lower water usage by up to 50 percent. You can reduce your electricity consumption by replacing inefficient lighting bulbs with compact fluorescent lights.
What should my cabinets look like?
It all depends on whether you are considering renting out your home or selling it. If you're planning to sell, you'll probably want to remove and refinish the cabinets. This gives buyers the illusion that they are brand new, and allows them to envision their kitchens once they move in.
However, if you want to rent your house, you should leave the cabinets alone. Many tenants are unhappy with the mess left behind by former tenants.
To make the cabinets look better, you can paint them. Make sure to use high-quality primers and paints. Low-quality paints can peel off over time.
Statistics
- 55%Universal average cost: $38,813Additional home value: $22,475Return on investment: 58%Mid-range average cost: $24,424Additional home value: $14,671Return on investment: (rocketmortgage.com)
- $320,976Additional home value: $152,996Return on investment: 48%Mid-range average cost: $156,741Additional home value: $85,672Return on investment: (rocketmortgage.com)
- bathroom5%Siding3 – 5%Windows3 – 4%Patio or backyard2 – (rocketmortgage.com)
- About 33 percent of people report renovating their primary bedroom to increase livability and overall function. (rocketmortgage.com)
- Windows 3 – 4% Patio or backyard 2 – 5% (rocketmortgage.com)
External Links
How To
How to remove tile grout from floor tiles
Most people don’t realize they use tile grouting. It is used to seal the joints between the tiles. Many different types of grout are available today, each using a specific purpose. We will show you how tile grout can be removed from floor tiles.
-
Before you begin, make sure you have everything you need. A grout cutter, grout scraper and some rags are all essential.
-
Now it is time to clean the grout and remove any debris or dirt that has gotten under the tiles. You can use the grout cutter to remove grout from the tiles and scrape off any remaining pieces. Take care not to damage the tiles.
-
After you've cleaned up everything, grab the grout scraper to remove any grout. If there isn't any grout left, you can go to step 4.
-
After all the cleaning is done, it's time to move on. One of the rags can be used to soak in water. You want to make sure that the rag gets completely wet. You can wring the rag out if it has become wet. This will ensure that any water remains in the rag.
-
Place the wet rag onto the joint where the tile meets the wall. Continue pressing down on the rag until you see the grout begin to fall apart. Slowly pull down on the rag until it is pulled towards you. Continue pulling it backwards and forwards until all the grout has been removed.
-
Repeat steps 4 and 5 until all the grout has been removed. Rinse your ragout. If necessary, repeat the process.
-
After you have removed all grout, use a damp cloth to wipe the tiles' surface. Let dry thoroughly.